Automating Serverless framework deployments using Bitbucket Pipelines
Bitbucket now offers pre-built Pipes to deploy Lambdas to AWS. But what if we want to deploy an entire Serverless stack? That’s what we’ll talk about today.
What is the Serverless framework?
The Serverless framework is a vendor-agnostic, declarative, and configurable framework. We use it to deploy Lambdas and their dependencies. We define our stack as a YAML file, and Serverless takes care of resource management.
If you haven’t heard of Serverless before, you can find out more here.
Goal: Deploy a Serverless project Lambda using Serverless
So today we want to deploy a test Serverless project using Bitbucket Pipelines.
To do this, we’ll need to:
- Create a test project.
- Configure AWS credentials for deployments.
- Configure credentials in Bitbucket.
- Write our pipelines file which will use our credentials and deploy our project to AWS.
Step 1: Create a test function
If you don’t already have a Serverless project you want to deploy, you can create a new one to test-drive from a template. Just run the command below:
serverless create --template hello-world
When we run the above command, Serverless will create a basic hello-world Lambda. A new serverless.yml file will have a Lambda function and an API gateway.
My handler.py file looks like this:
import json

def hello(event, context):

    body = {
        "message": "Go Serverless v1.0! Your function executed successfully!",
        "input": event
    }

    response = {
        "statusCode": 200,
        "body": json.dumps(body)
    }

    return response

    # Use this code if you don't use the http event with the LAMBDA-PROXY
    # integration
    # """
    # return {
    #     "message": "Go Serverless v1.0! Your function executed successfully!",
    #     "event": event
    # }
    # """
And my serverless.yml file looks like this (I’ve made a few changes):
service: ayush-test

provider:
  name: aws
  runtime: python3.7
  stage: "dev"
  region: "us-east-1"
  timeout: 30
  stackTags:
    Project: "MyProject"
    deployed_by: "Ayush Sharma"
    deployed_tag: "master"
    deployed_on: "<date>"
  deploymentBucket: 'my-deployment-bucket'

package:
  exclude:
    - .gitignore
    - bitbucket-pipelines.yml
    - README.md
    - serverless.yml
  excludeDevDependencies: true
  individually: true

functions:
  hello:
    handler: handler.hello
    events:
      - http:
          path: /
          method: get
          cors: true
Step 2: Configure AWS credentials
For AWS credentials, create a new IAM user with AWS Lambda and API gateway permissions. You can use the same steps we used the last time.
It’s very important to follow the least-privilege principle while creating these credentials. Keep the policy as tight as possible, since we will want to re-use it in many deployments.
Step 3: Create our Pipelines file
Now create a bitbucket-pipelines.yml file and add the following:
image: node:11.13.0-alpine

pipelines:
  branches:
    master:
      - step:
          caches:
            - node
          script:
            - apk add python3
            - npm install -g serverless
            - serverless config credentials --stage dev --provider aws --key ${AWS_DEV_LAMBDA_KEY} --secret ${AWS_DEV_LAMBDA_SECRET}
            - serverless deploy --stage dev
There are a few things going on in the pipelines file above:
- We’re using the
node:11.13.0-alpineDocker image in our pipeline. This image is small in size and has thenpmpackage manager already installed. - The
caches:step will cache all the node dependencies so they can be re-used. - We’re using
apk(the Alpine package manager) to install the Serverless dependencies. - The
serverless configcommand will configure our AWS credentials. - The
serverless deploycommand will deploy our stack from theserverless.ymlfile.
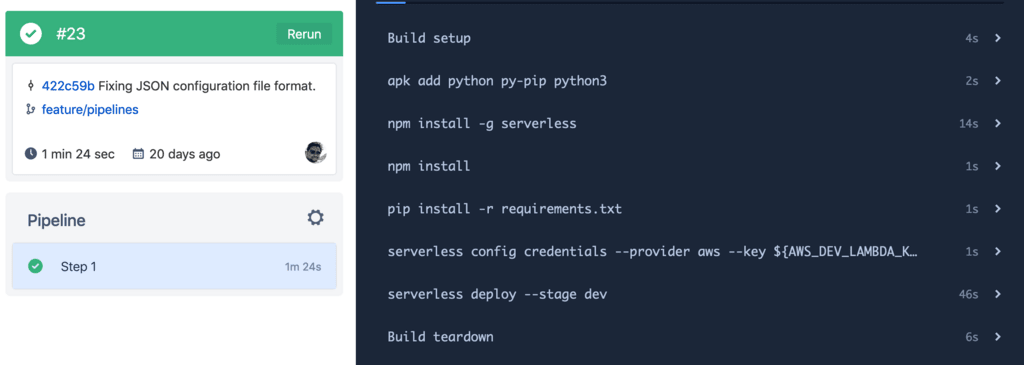
Step 4: Executing our deployment
Committing the above changes in our repo will trigger the Bitbucket pipeline. If all goes well, we should see the following:
Wrapping it up
With the above pipeline ready, we can use other Bitbucket features to make improve it. Features like merge checks, branch permissions, and deployment targets can make deployments smoother. We can also tighten the IAM permissions to ensure it has access to only the resources it needs.
A custom Bitbucket Pipe can also abstract away a lot of boilerplate code. Using Pipes, we can use standards and best practices across all Serverless deployments.
And that’s all. I hope you’ve enjoyed this demo. You can find more resources below.
Thanks, and happy coding :)
Resources

Help me fuel up so I can keep typing typing typing...
&emoji=☕&slug=ayushsharma&button_colour=FFDD00&font_colour=000000&font_family=Cookie&outline_colour=000000&coffee_colour=ffffff)